
PowerConnect Splunk App Upgrade
Splunk App Upgrade Guide for SAP PowerConnect App 9.0.0
Before Completing the Update
Please check the release notes for your planned upgrade release for any known issues that may need resolving for the best experience.
When upgrading to 8.3.0+, some PowerConnect dashboards require use of metrics in Splunk. It is recommended to create a new metric index as the use cases for metrics are expanded in future releases. For more information, see Create Splunk Indexes for SAP data.
For Splunk Cloud customers running PowerConnect Splunk app versions 7.0.0-7.2.0, please refer to Knowledge Base #173 to address a bug specific to Splunk Cloud that may prevent the Master Inventory Lookup (and potentially other KVstore-based lookups) from generating properly.
If you have made any custom changes to the following files:
Lookups stored at “$SPLUNK_HOME$/etc/apps/BNW-app-powerconnect/lookups/”
The navigation file default.xml located at “$SPLUNK_HOME$/etc/apps/BNW-app-powerconnect/local/data/ui/nav/default.xml”
Please back up these files before upgrading, as they may be overwritten during the upgrade process and may need to be restored after the upgrade. To back up the lookups without direct access to the files, you can run a search with “| inputlookup <lookup_name>” and download the results as a CSV file. To back up the nav file without direct access to the XML, go to “Settings > User Interface > Navigation Menus” and open the “default” nav file with the app label “BNW-app-powerconnect.” You can then copy the data to a notepad and save it as default.xml.
Update
Install the app through the UI. Navigate to the “Manage Apps” page.
To update manually…
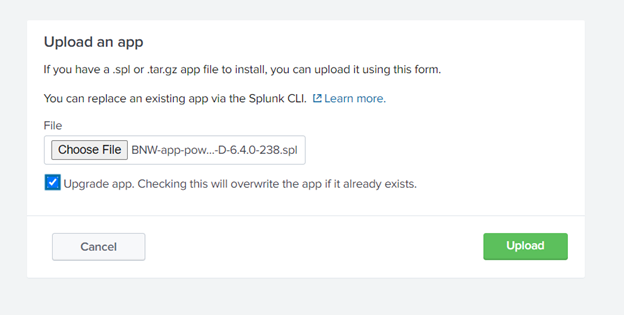
Click “Install app from file.”
Upload the new app package.
Check “Upgrade app.”
To upgrade through Splunkbase…
Find the row showing the app installation info.
Click “Update.”
Confirm. Enter credentials if needed. If credentials are required, the Splunk account being used to authorize the upgrade must be an approved downloader of the app. If your organization does not have an approved downloaded, please contact PowerConnect support.
Restart Splunk. If installing through Splunkbase or on Splunk Cloud, this may already be done.
From "Manage Apps" click on the "Set Up" link beside BNW-app-powerconnect entry. Follow the steps given in the following document to complete the Set up.

Please restore backups of any custom data:
Lookups can be reuploaded to $SPLUNK_HOME$/etc/apps/BNW-app-powerconnect/lookups/
Compare the backup navigation XML to the new navigation XML and integrate any desired changes.
Configuration:
Your SAP Landscape information needs to be updated. There are two ways to complete this step:
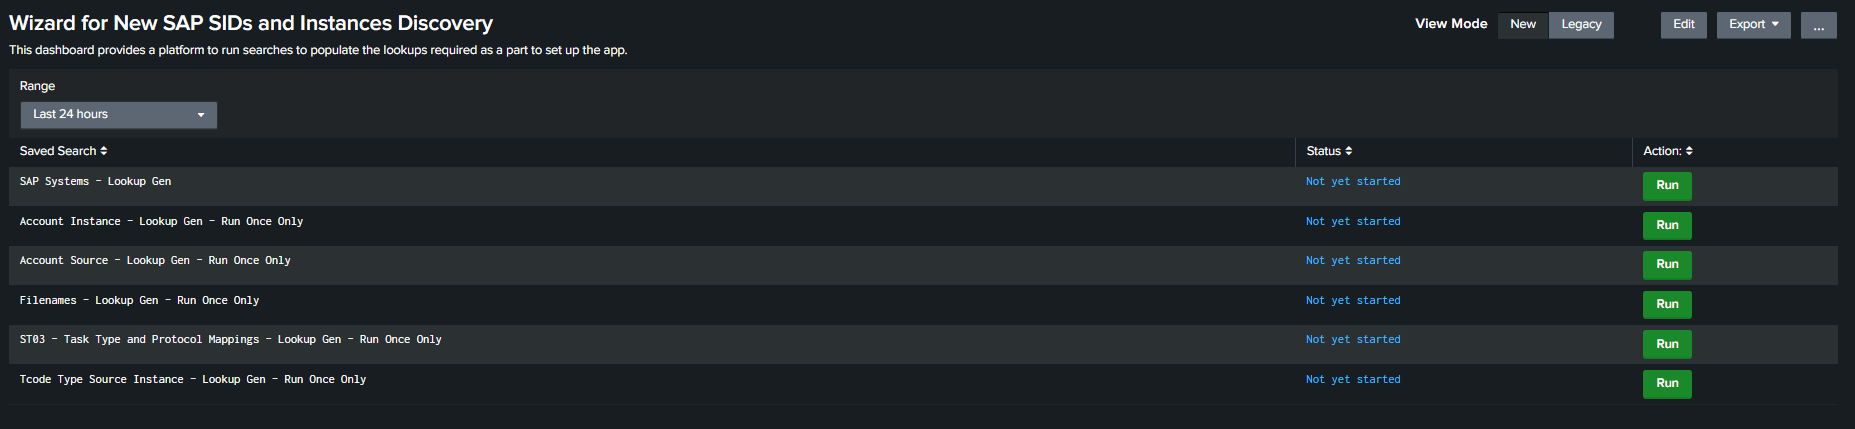
Open the dashboard "Wizard for New SAP SIDs and Instances Discovery" under the PowerConnect > Wizard menu.
Click the “Run” button for the corresponding searches. “SAP Systems - Lookup Gen” will create a new source lookup to be used throughout the app. The status of the search will be updated in the Status column of the table, and the user can view the search results once the search has completed by clicking “View Results.”
If you want to convert your existing master_inventory_lookup to the new sap_systems lookup, please run the search below (run without the final outputlookup line to test the output):
CODE| makeresults count=0 | append [inputlookup master_inventory_lookup | eval sys_type="abap" | rename CPU as core_count "Category Type" as level "Component Version" as comp_version "Database Host" as db_host "Database Name" as db_name "Database System" as db_type "Database Version" as db_version "File System" as file_sys "IP" as ip "Installation Number" as install_id "Instance Name" as instance_name "Kernel Release" as kernel_release "Machine Type" as machine_type "Memory" as memory_gb "Operating System" as os_type "Source" as sys_id "Unicode System" as unicode "User Preference" as user_pref] | append [inputlookup jmx_lookup | eval sys_type="java",sys_subtype="" | rename source as sys_id] | append [inputlookup cloud_api_source_lookup.csv | eval sys_type="cloud",sys_subtype="api-m" | rename sid as sys_id] | append [inputlookup cloud_cpi_source_lookup.csv | eval sys_type="cloud",sys_subtype="cpi" | rename sid as sys_id] | append [inputlookup cloud_ariba_source_lookup.csv | eval sys_type="cloud",sys_subtype="ariba"] | append [inputlookup cloud_cp_audit_log_source_lookup.csv | eval sys_type="cloud",sys_subtype="btp"] | append [inputlookup cloud_cpq_source_lookup.csv | eval sys_type="cloud",sys_subtype="cpq"] | append [inputlookup cloud_success_factor_source_lookup.csv | eval sys_type="cloud",sys_subtype="sf"] | table sys_id level sys_type sys_subtype instance_name ip install_id machine_type core_count os_type comp_version kernel_release file_sys memory_gb db_name db_type db_version db_host unicode user_pref status | outputlookup append=true pc_sap_systemsOnce your SAP Systems lookup has been created, it is recommended to run the SAP Systems Lookup Generator search in the “Wizard for New SAP SIDs and Instances Discovery” to refresh your system lookup.
When upgrading to 9.0.0+, customers with at least 24 hours of system data in Splunk may wish to jump start the pc_extractor_data lookup by running the pc_extractor_data_update saved search over the previous 24 hours of data, providing a cache of extractor information for use throughout the app. If you do not decide to do this, the search should update the lookup within 24 hours automatically.
Optional Configuration (multi-language support):
The app version 8.5.0 and onwards supports English, German, Japanese, and partial Korean languages. By default, Splunk automatically uses the language that the user's browser is set to. To switch languages, either the browser's locale setting can be changed or for a given Splunk session it can be changed by modifying the URL that you use to access Splunk. For different languages use the URL as specified:
German: http://<your_splunk_instance_address>/de-DE/app/BNW-app-powerconnect/
Japanese: http://<your_splunk_instance_address>/ja-JP/app/BNW-app-powerconnect/
Korean (limited support): http://<your_splunk_instance_address>/ko-KR/app/BNW-app-powerconnect/
American English: http://<your_splunk_instance_address>/en-US/app/BNW-app-powerconnect/
British English: http://<your_splunk_instance_address>/en-GB/app/BNW-app-powerconnect/ *(Replace the placeholder in the URL)
Note: In case the dashboard is not getting shown in the expected language after going to the appropriate URL, the user should clear the browser cache and refresh the dashboard.
Reference: {*}{+}https://docs.splunk.com/Documentation/Splunk/8.0.6/Admin/Userlanguageandlocale+*